Your wedding cake is more than dessert; it becomes a centerpiece that sets the tone for your reception. The right design should feel elegant, match your theme, and still be practical for serving guests. From classic tiered cakes to modern metallic finishes, today’s styles focus on clean details, soft textures, and balanced presentation.
These ideas are designed to help you visualize and plan your cake easily, without confusion or overcomplication.
1. Classic Multi-Tier White Fondant Cake
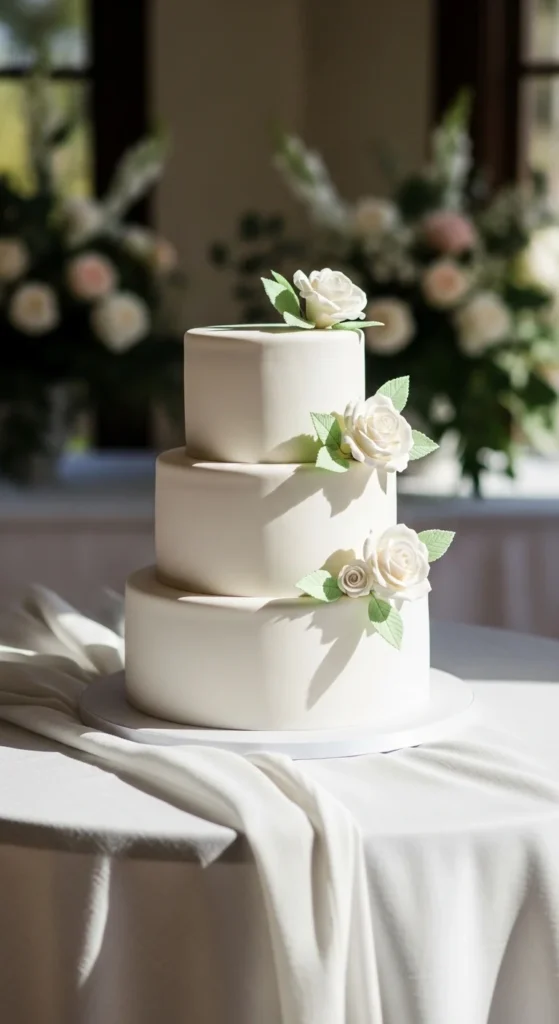
This cake keeps everything clean and timeless with smooth white tiers stacked neatly. It works across almost every wedding theme and gives you flexibility to add small details without changing the overall look. The simplicity is what makes it stand out and feel elegant.
Ingredients
- Smooth white fondant
- Multiple cake tiers
- Fresh or sugar flowers
- Cake base and support structure
Instructions
- Stack cake tiers evenly using support rods for stability.
- Cover each tier with smooth white fondant for a clean finish.
- Align tiers carefully to maintain a straight structure.
- Add minimal floral accents or keep it plain for a classic look.
How to Serve It
Place it at the center of your reception table where it naturally becomes the focal point. Keep the surrounding décor soft and simple so the cake stands out. It looks beautiful in photos from every angle, so you don’t need to over-style it.
2. Gold-Accent Luxury Wedding Cake
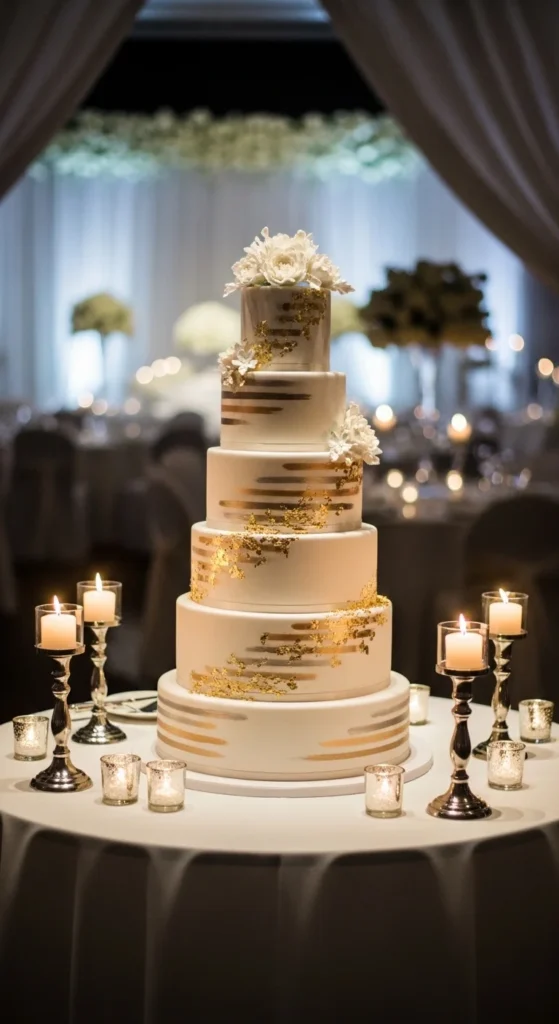
This design adds a rich, warm feel through gold detailing layered over a neutral base. The metallic finish catches light in a subtle way, making it perfect for evening receptions. It feels refined without being too heavy or overdone.
Ingredients
- White or neutral cake base
- Gold leaf or edible metallic paint
- Smooth fondant or buttercream
- Optional floral accents
Instructions
- Cover the cake with a smooth layer of fondant or buttercream.
- Apply gold leaf or metallic accents gently across the surface.
- Focus on edges or random strokes for a natural effect.
- Keep detailing balanced so it doesn’t overpower the design.
How to Serve It
Set it under warm lighting or near candles so the gold details reflect softly. Keep the table styling minimal and elegant. The shimmer will naturally draw attention without needing extra decoration.
3. Silver Metallic Elegant Cake
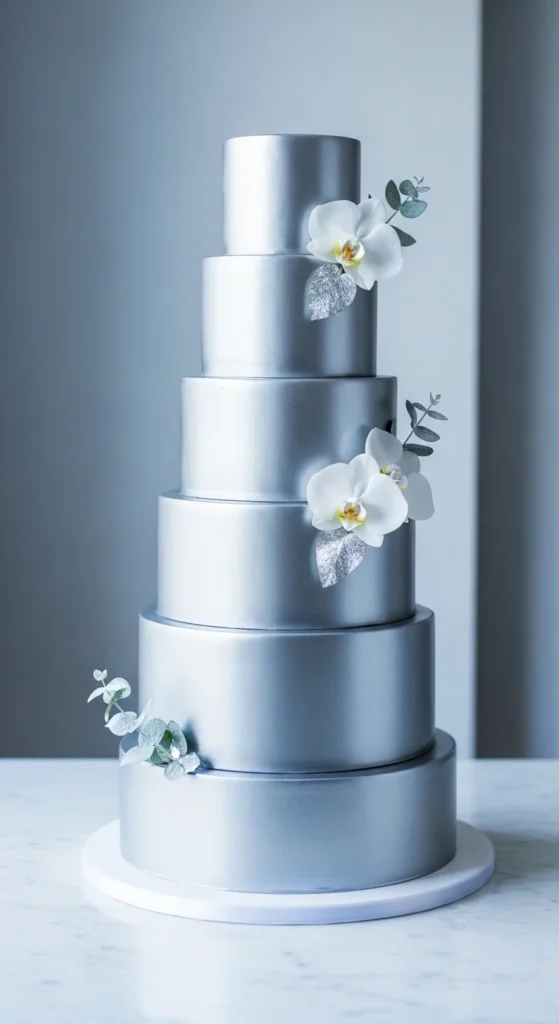
This cake brings a modern and polished look with soft silver tones and a subtle shine. It works well for contemporary weddings and pairs easily with cool color palettes. The finish is sleek and minimal, which keeps the design clean.
Ingredients
- Silver or pearlescent edible finish
- Smooth fondant or buttercream
- Structured cake tiers
- Minimal decorative elements
Instructions
- Cover the cake with a smooth base layer.
- Apply metallic or pearlescent finish evenly across tiers.
- Keep edges sharp and clean for a modern look.
- Avoid heavy decoration to maintain simplicity.
How to Serve It
Place it in a well-lit area so the shine is visible. Pair it with neutral décor like whites, greys, or soft pastels. It looks best when the setup stays clean and uncluttered.
4. Rose Gold Wedding Cake Design
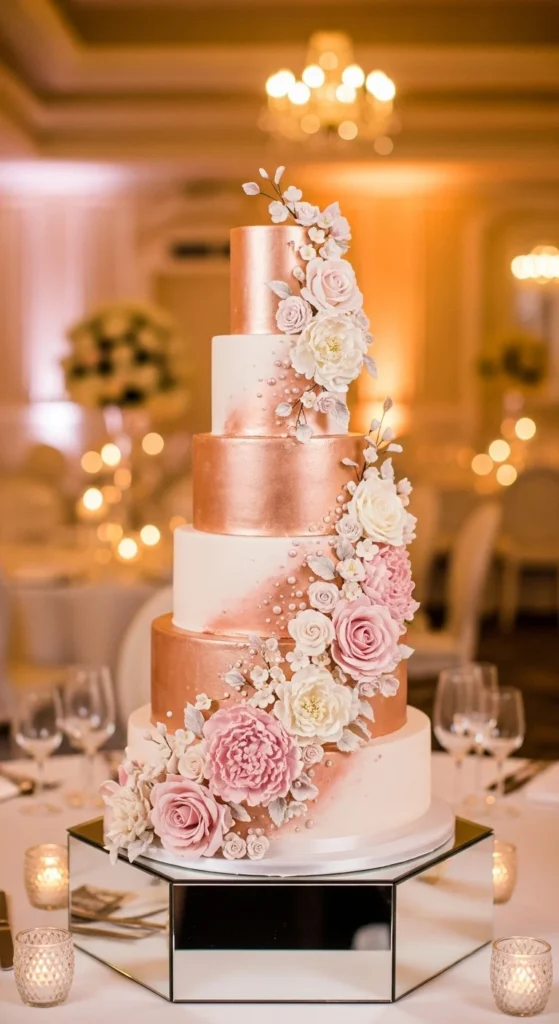
Rose gold adds a soft and romantic touch while still keeping a modern feel. The warm tone blends beautifully with florals and pastel themes, making it a popular choice for dreamy receptions. It feels gentle but still eye-catching.
Ingredients
- Rose gold edible finish
- Soft pink or neutral base
- Floral accents
- Smooth or lightly textured surface
Instructions
- Apply a smooth base layer to the cake.
- Add rose gold finish using brush strokes or light coating.
- Blend tones softly for a balanced look.
- Add floral accents to complement the color.
How to Serve It
Place it near floral arrangements so everything feels connected. Warm lighting enhances the rose gold tones and makes the cake look even more elegant. It naturally fits into soft, romantic setups.
5. Fresh Berry-Topped Wedding Cake
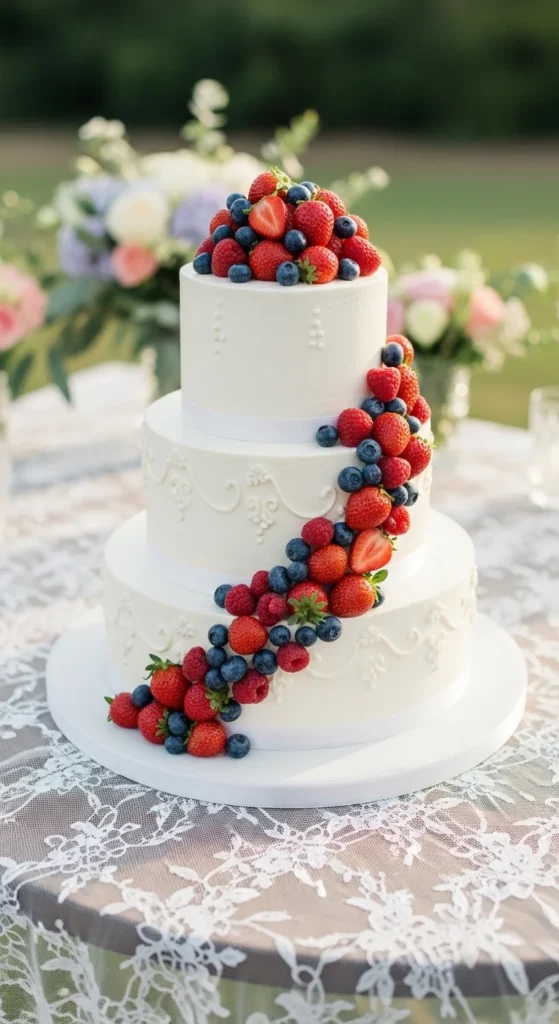
This cake feels fresh, light, and naturally elegant. Instead of heavy decoration, it uses real fruit to create color, texture, and contrast. It works especially well for outdoor, garden, or summer weddings where a softer, more organic look fits the setting.
Ingredients
- Fully baked and cooled cake tiers
- Buttercream frosting (stable, medium consistency)
- Fresh strawberries, blueberries, raspberries
- Edible glaze or apricot jam (for shine)
- Cake boards and dowels for support
Instructions
- Level and stack your cake tiers using dowels for proper support.
- Apply a crumb coat and chill the cake for 20–30 minutes to set the base.
- Add a final smooth layer of buttercream and finish edges cleanly.
- Wash and completely dry all berries (moisture will ruin the frosting).
- Arrange larger fruits first on top, then fill gaps with smaller berries.
- Keep fruit slightly away from edges to prevent slipping.
- Lightly brush berries with glaze to give a fresh, polished look.
- Refrigerate briefly until serving to keep fruit firm and stable.
How to Serve It
Bring it out shortly before cutting so the fruit stays fresh and glossy. It looks best in natural light, especially in outdoor settings. You don’t need heavy decoration around it; the fruit already does the work.
6. Candied Citrus Adorned Cake
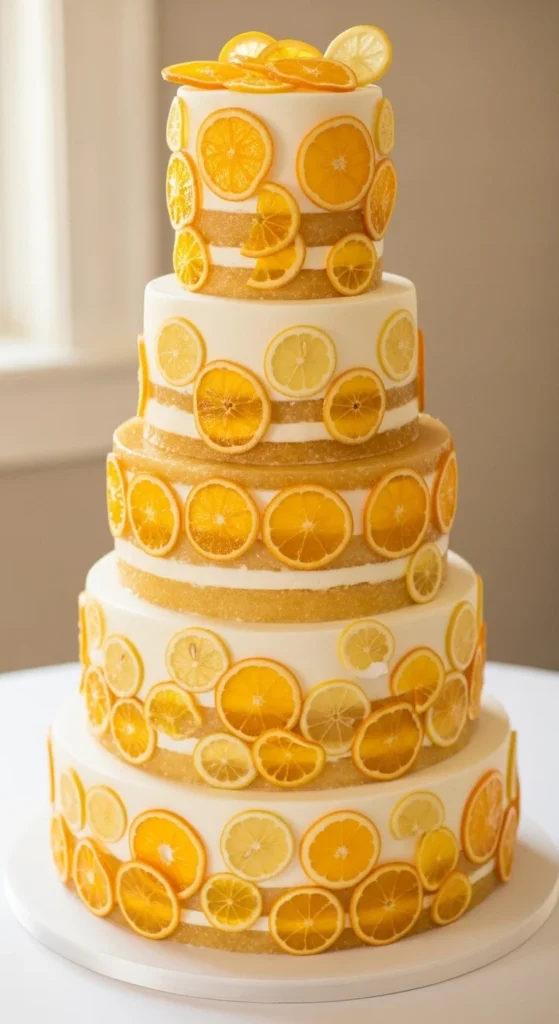
This cake uses candied citrus to create a bright, slightly glossy finish that feels refined but different. The translucent slices add depth and texture while keeping the overall design clean. It works especially well for modern, summer, or destination weddings.
Ingredients
- Fully baked and cooled cake tiers
- Buttercream or fondant finish
- Candied orange and lemon slices
- Light sugar syrup or edible glaze
- Cake boards and dowels
Instructions
- Stack and secure cake tiers using dowels for stability.
- Apply a crumb coat and chill for 20–30 minutes.
- Add a smooth final layer of buttercream or fondant.
- Pat candied citrus slices dry to remove excess syrup.
- Arrange slices starting from the base or one side for a cascading effect.
- Slightly overlap slices to create a layered, natural look.
- Use a small amount of buttercream or glaze to secure each piece.
- Chill briefly to set the design before display.
How to Serve It
Keep it in a cool space so the citrus holds its shape. The glossy finish looks best under soft lighting. You don’t need extra decoration the citrus already adds enough detail.
7. Single-Tier Statement Cake
This cake focuses on one large tier instead of multiple stacked layers, making it bold and modern. The design relies on clean structure and one strong decorative element rather than multiple details. It’s easier to handle and works well for smaller or minimalist weddings.
Ingredients
- One large, tall cake layer
- Buttercream or fondant finish
- Internal support board (if layered inside)
- Decorative element (flowers, texture, or metallic detail)
Instructions
- Level and stack layers to create one tall, stable tier.
- Insert internal support if the cake has multiple inner layers.
- Apply a crumb coat and chill until firm.
- Add a smooth final coat and sharpen edges for a clean look.
- Choose one focal decoration (floral cluster, texture, or accent).
- Place decoration strategically to keep balance and simplicity.
- Keep the rest of the surface clean to maintain the statement look.
How to Serve It
Place it on a raised stand so it feels like a centerpiece. Surround it with minimal décor like candles or flowers. The simplicity is what makes it stand out, so don’t overcrowd the setup.
8. Vintage 80s Pillar Wedding Cake
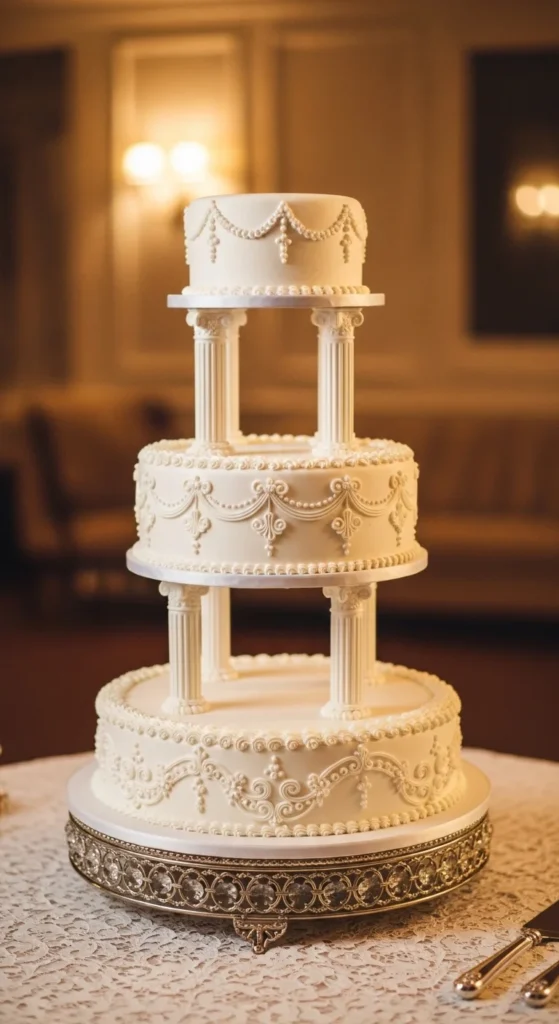
This cake brings back a classic vintage style with elevated tiers supported by pillars and detailed piping. It feels dramatic and decorative, making it ideal for traditional or nostalgic wedding themes. The structure itself becomes a key part of the design.
Ingredients
- Multiple baked cake tiers
- Pillar support system (plastic or metal)
- Cake boards for each tier
- Buttercream or fondant
- Piping bags and decorative tips
Instructions
- Prepare each cake tier separately and place on individual boards.
- Apply crumb coat and final coating to all tiers.
- Add piping details (borders, swags, or lace patterns) before stacking.
- Insert pillars into the base tier, ensuring even spacing and level support.
- Place the next tier carefully on top of the pillars.
- Repeat layering if using more tiers.
- Check stability and alignment from all angles before final setup.
How to Serve It
Display it in a central location where the height and structure are visible. Soft lighting enhances the details and piping work. Keep surrounding classic décor so the vintage style feels complete.
9. Lambeth Piping Vintage Cake
This cake features detailed piping work that builds layers of texture across each tier. The design is bold and decorative, often using symmetrical patterns that give it a classic vintage feel. It stands out because of the craftsmanship rather than color or additional elements.
Ingredients
- Fully baked and cooled cake tiers
- Buttercream (stiff consistency for piping)
- Piping bags
- Piping tips (round, star, petal)
- Cake boards and dowels
Instructions
- Stack and secure cake tiers using dowels for stability.
- Apply a smooth base coat of buttercream and chill until firm.
- Fill piping bags with stiff buttercream for clean, defined shapes.
- Pipe borders, swags, and scrolls layer by layer across the cake.
- Build depth by piping over previous designs instead of spreading flat.
- Keep spacing even and patterns symmetrical.
- Chill the cake again to set the piping details.
How to Serve It
Place it where guests can see the details up close. Soft lighting helps highlight the texture and depth. Keep the setup simple so the piping work remains the focus.
10. Textured Buttercream Pleated Cake
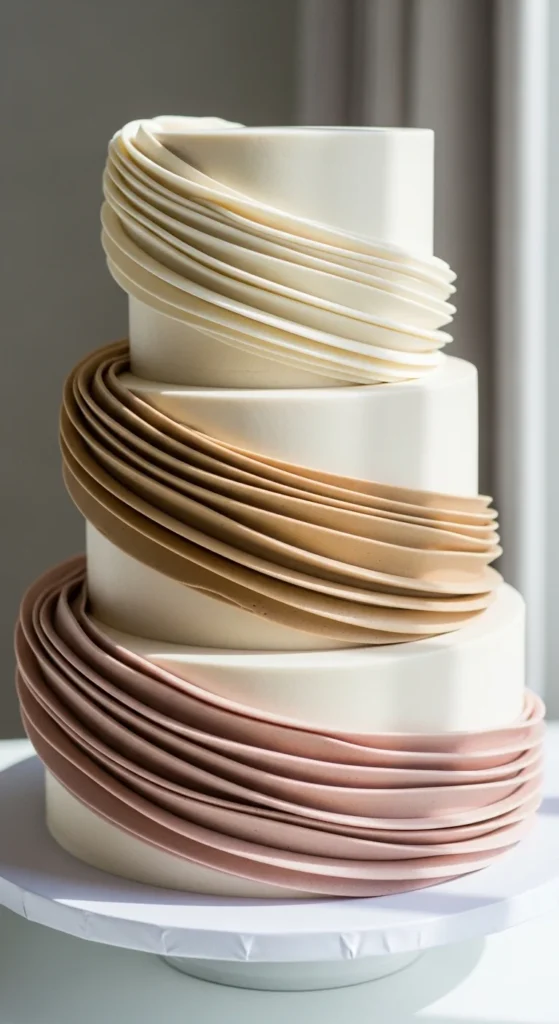
This cake uses buttercream to create a pleated or fabric-like texture across the surface. The design feels soft and elegant while still being visually interesting. It’s a great option if you want something minimal but not completely plain.
Ingredients
- Cake tiers (stacked and leveled)
- Buttercream (medium consistency)
- Offset spatula or palette knife
- Cake scraper
- Cake boards and dowels
Instructions
- Stack and crumb coat the cake, then chill until firm.
- Apply a thicker final layer of buttercream.
- Use a spatula or palette knife to create vertical or diagonal pleats.
- Work in sections to maintain consistent texture.
- Lightly smooth edges without removing the pattern.
- Chill briefly to set the buttercream.
How to Serve It
Keep it in soft lighting so the texture is visible. You can add a few flowers if you want, but it already has enough detail. It works best with a calm, minimal setup.
11. Stucco Buttercream Finish Cake
This cake has a rough, slightly uneven buttercream finish that gives it a natural and modern look. Instead of aiming for perfection, the texture adds character and makes the cake feel more relaxed and organic.
Ingredients
- Cake tiers
- Buttercream (medium to thick consistency)
- Offset spatula
- Cake boards and dowels
Instructions
- Stack and crumb coat the cake, then chill until set.
- Apply a generous layer of buttercream over the entire cake.
- Use a spatula to create random, uneven texture across the surface.
- Avoid over-smoothing to keep the stucco effect visible.
- Check that the structure remains stable and even.
- Chill lightly to set the finish.
How to Serve It
Place it in a natural or outdoor-style setting where the texture fits the theme. It pairs well with greenery or simple décor. The imperfect finish is what makes it stand out.
12. Pearl-Infused Minimalist Cake
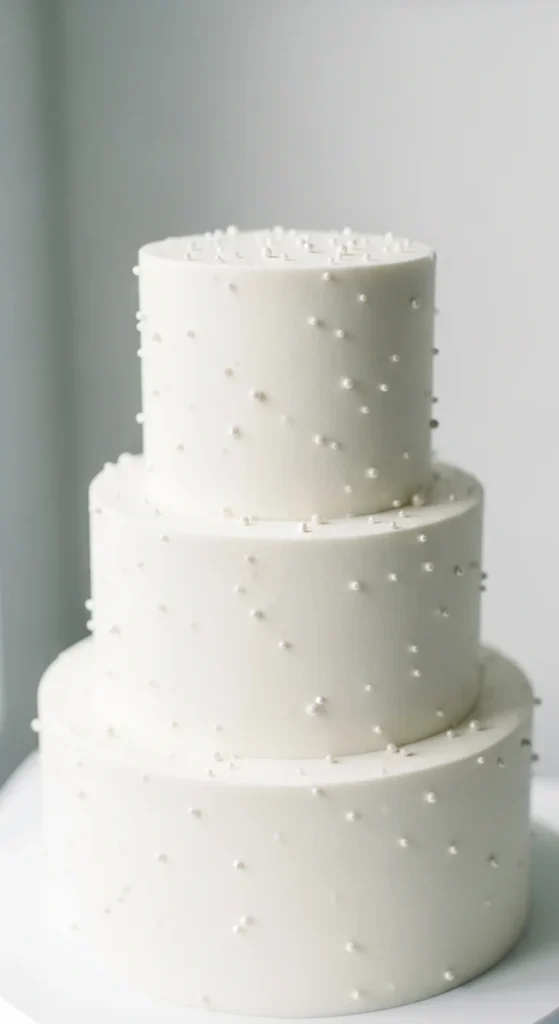
This cake keeps the base clean and smooth while adding small pearl details for a subtle touch of elegance. It’s simple but refined, making it perfect for modern weddings that focus on minimal design.
Ingredients
- Smooth frosted cake tiers
- Edible sugar pearls
- Tweezers or placement tool
- Cake boards and dowels
Instructions
- Stack and smooth the cake with a clean buttercream or fondant finish.
- Plan pearl placement before starting to keep spacing balanced.
- Attach pearls individually using a small amount of buttercream.
- Place them evenly or in a light scattered pattern.
- Keep the rest of the surface clean and uncluttered.
- Chill briefly to secure the pearls.
How to Serve It
Place it in a well-lit area so the pearl details are visible. It works best with a clean, minimal setup. You can add soft florals nearby, but keep everything subtle.
13. Edible Pearl Cascade Cake
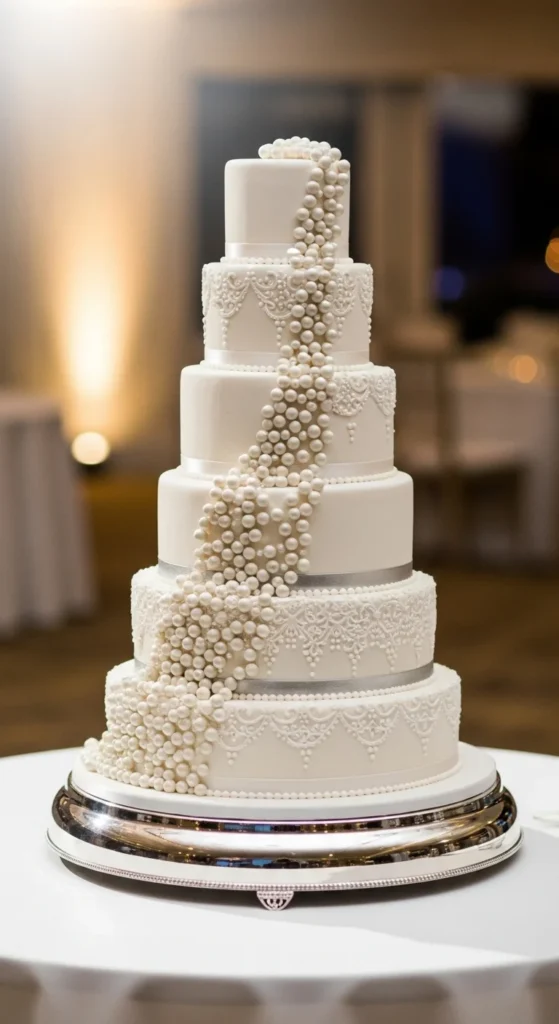
This design builds on the pearl concept by creating a cascading effect that flows across the tiers. The movement adds a sense of luxury while still keeping the color palette simple and elegant.
Ingredients
- Cake tiers (stacked and secured)
- Edible sugar pearls (varied sizes)
- Buttercream or fondant base
- Placement tools (tweezers or piping gel)
Instructions
- Apply a smooth finish to the cake and chill until firm.
- Plan the cascade path from top tier to bottom before placing pearls.
- Start placing pearls from the top, working downward.
- Use different sizes to create a natural flow effect.
- Keep spacing slightly irregular for a more realistic cascade.
- Secure each pearl with a small amount of buttercream or edible glue.
- Chill to set the design firmly in place.
How to Serve It
Position it where one side is clearly visible since that’s where the cascade will shine. Keep lighting soft to highlight the details. It doesn’t need extra decoration; the pearls already create the effect.
14. Blush Ombré Wedding Cake
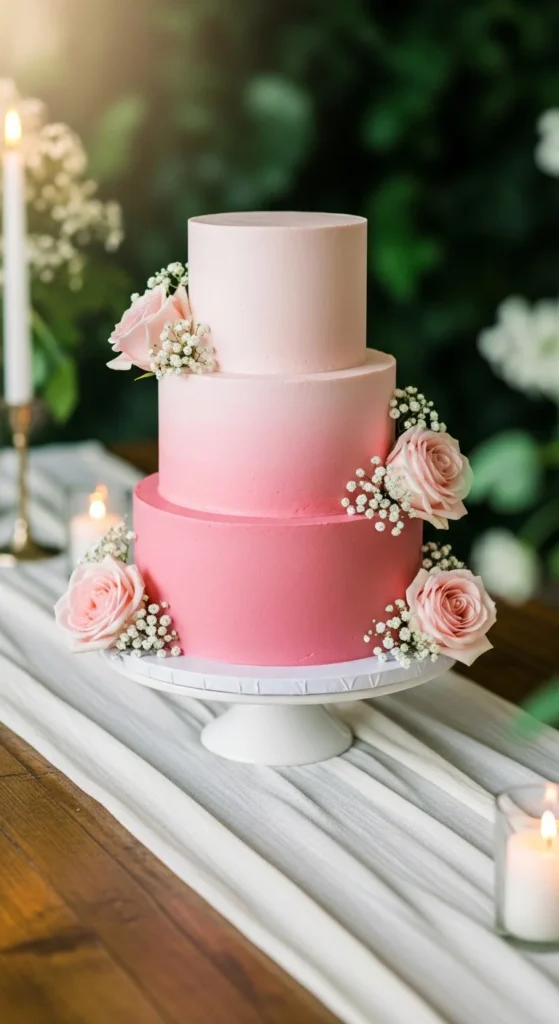
This cake creates a soft color transition that feels romantic and modern at the same time. The gradual fade from light to deeper blush tones adds depth without needing heavy decoration. It’s a popular choice for weddings with pastel or floral themes.
Ingredients
- Cake tiers (stacked and leveled)
- Buttercream (divided into light and darker blush shades)
- Offset spatula
- Cake scraper
- Cake boards and dowels
Instructions
- Stack and crumb coat the cake, then chill until firm.
- Divide buttercream into 2–3 shades of blush (light to dark).
- Apply darker shade at the base and lighter shades toward the top.
- Use a scraper to smooth the sides and blend colors together.
- Continue smoothing until the gradient looks soft and seamless.
- Refine edges and chill to set the finish.
How to Serve It
Place it in soft lighting so the gradient is visible. It pairs naturally with floral décor and pastel themes. Keep the setup light and romantic to match the tones.
15. Lavender Gradient Floral Cake
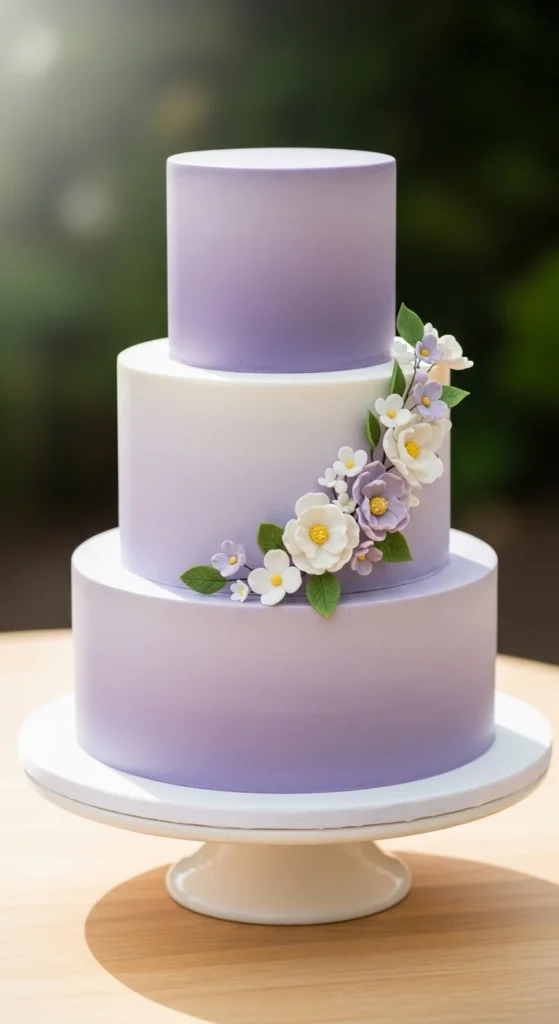
This design combines a gentle lavender gradient with floral details for a soft, dreamy look. The color transition adds depth while the flowers bring a natural touch. It works beautifully for spring or garden weddings.
Ingredients
- Cake tiers
- Buttercream (lavender shades)
- Fresh or sugar flowers
- Offset spatula
- Cake boards and dowels
Instructions
- Stack and crumb coat the cake, then chill until set.
- Tint buttercream into multiple lavender shades.
- Apply darker tones at the base and lighter tones toward the top.
- Blend smoothly using a scraper until the gradient looks even.
- Place flowers strategically on one side or between tiers.
- Press flowers gently into the buttercream to secure.
- Chill briefly to set the design.
How to Serve It
Position it where both the gradient and florals are visible. It works well with outdoor or floral-themed setups. Keep the surrounding décor soft to match the tone.
16. Geometric Cube Wedding Cake
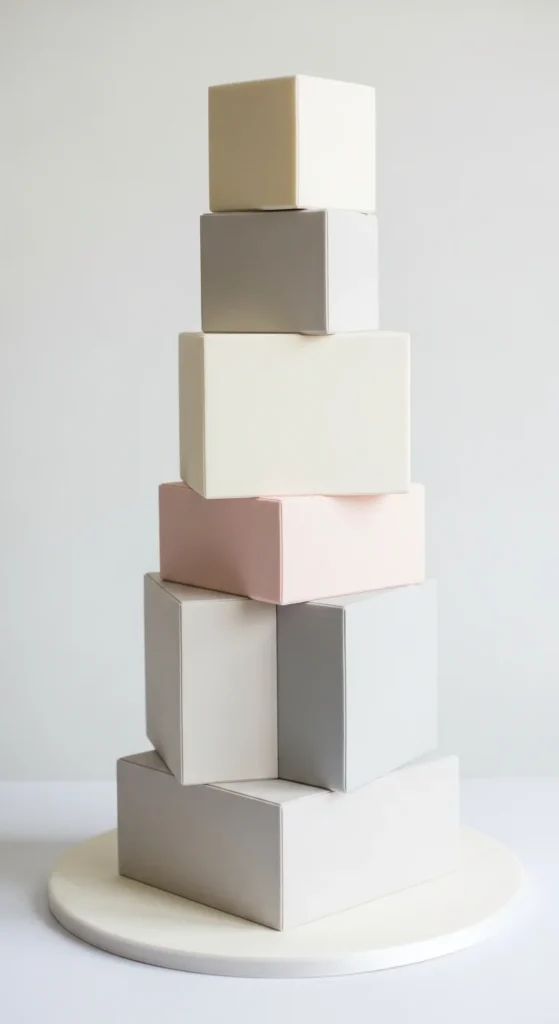
This cake uses clean, sharp edges to create a bold, modern look. Instead of soft curves, it focuses on structure and symmetry. It’s perfect for contemporary weddings where design and shape matter more than decoration.
Ingredients
- Square or cube-shaped cake tiers
- Fondant for sharp edges
- Cake boards and internal supports
- Smoothing tools
Instructions
- Stack square cake layers carefully to maintain straight edges.
- Apply crumb coat and chill until firm.
- Cover with fondant, smoothing each side evenly.
- Sharpen edges using smoothing tools for a clean finish.
- Align tiers precisely to maintain geometric symmetry.
- Keep decoration minimal to highlight the structure.
How to Serve It
Place it on a clean, modern table setup. It looks best with minimal décor and neutral tones. The structure itself is the main visual element, so keep everything else simple.
17. Hexagon Modern Wedding Cake
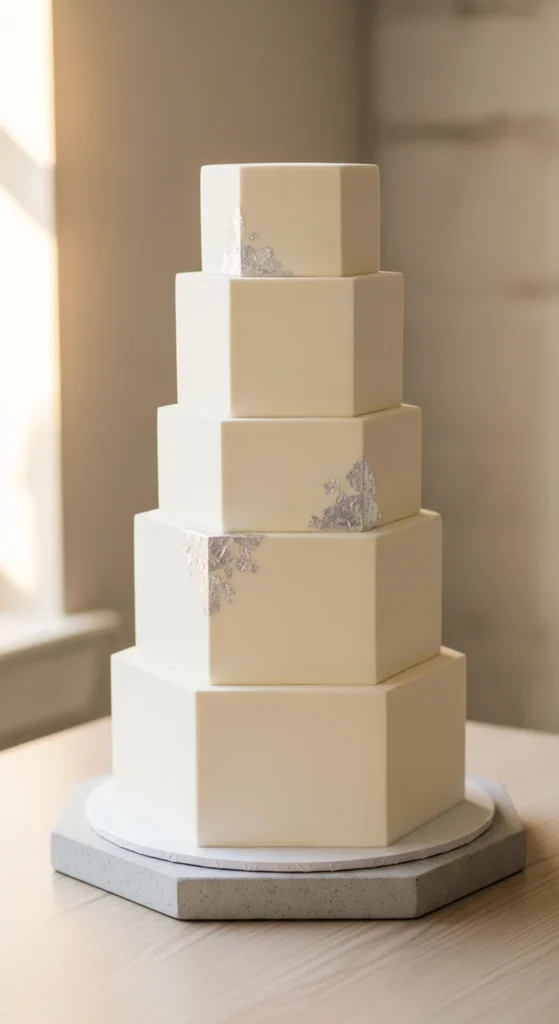
This cake takes geometric design further with a hexagon shape, giving it a unique and modern feel. The angles create visual interest without needing heavy decoration. It’s ideal for couples who want something slightly different but still elegant.
Ingredients
- Hexagon-shaped cake tiers
- Fondant or smooth buttercream
- Cake boards and supports
- Edge smoothing tools
Instructions
- Bake or carve cake into a hexagon shape with clean sides.
- Stack layers evenly and secure with internal supports.
- Apply a crumb coat and chill until firm.
- Cover with fondant or buttercream, smoothing each edge carefully.
- Refine angles to keep the geometric shape sharp.
- Keep decoration minimal to highlight the structure.
How to Serve It
Display it where the shape is clearly visible from multiple angles. Pair it with modern décor and clean lines. It naturally stands out, so it doesn’t need much styling.
18. Sugar Flower Peony Cascade Cake
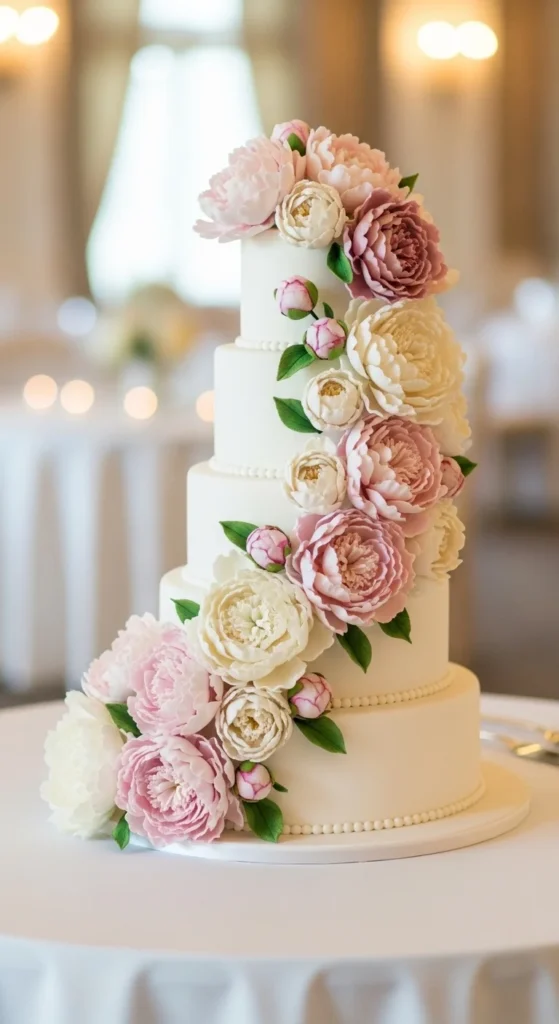
This cake features handcrafted sugar peonies arranged in a flowing cascade from top to bottom. The flowers add softness and movement, making the design feel full without overcrowding the cake. It’s ideal for romantic and floral-themed weddings.
Ingredients
- Cake tiers (stacked and supported)
- Smooth buttercream or fondant finish
- Sugar peony flowers (various sizes)
- Floral wires or edible glue
- Cake boards and dowels
Instructions
- Stack and secure cake tiers with proper support.
- Apply a smooth finish and chill until firm.
- Prepare sugar flowers with wired stems trimmed to safe lengths.
- Plan the cascade flow from top tier to base before placing.
- Insert or attach larger flowers first as anchors.
- Fill gaps with smaller blooms to create a natural flow.
- Keep spacing balanced to avoid overcrowding one section.
- Chill lightly to set the arrangement.
How to Serve It
Position the cake so the cascade side faces guests. Soft lighting helps highlight the details of the petals. It works beautifully with floral décor around the table.
19. Lily of the Valley Elegant Cake
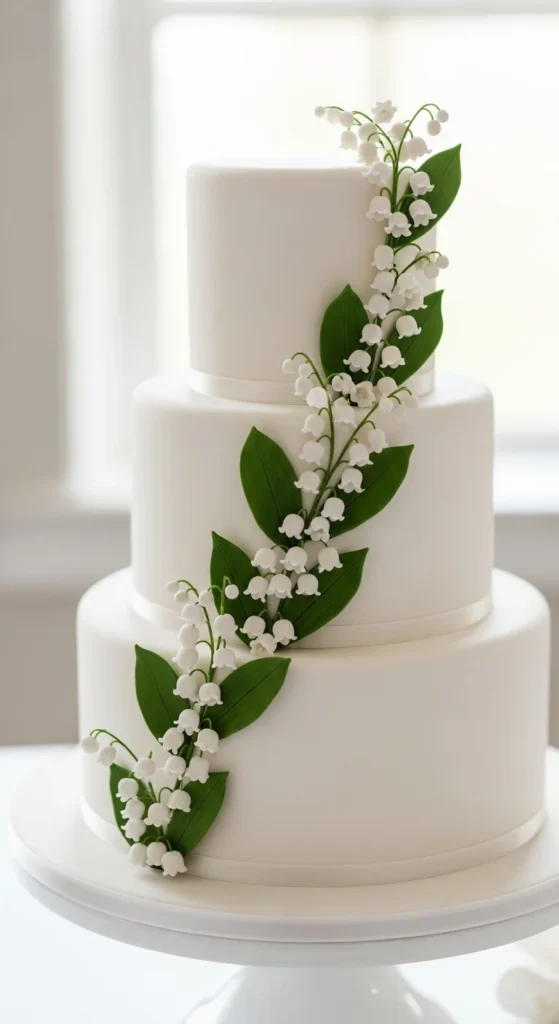
This cake uses small, delicate sugar flowers to create a refined and understated look. The design focuses on fine detail rather than bold elements, making it perfect for elegant and minimal weddings.
Ingredients
- Cake tiers
- Smooth white fondant or buttercream
- Sugar lily of the valley flowers
- Edible glue or piping gel
- Cake boards and dowels
Instructions
- Stack and smooth the cake with a clean white finish.
- Chill until the surface is firm and stable.
- Arrange flower placement lightly before attaching.
- Attach flowers gently using edible glue or piping gel.
- Keep spacing minimal to maintain a delicate appearance.
- Avoid heavy clustering to preserve the refined look.
How to Serve It
Place it in a bright area so the small details are visible. It pairs best with clean, simple décor. The beauty is in the subtle design, so keep everything around it minimal.
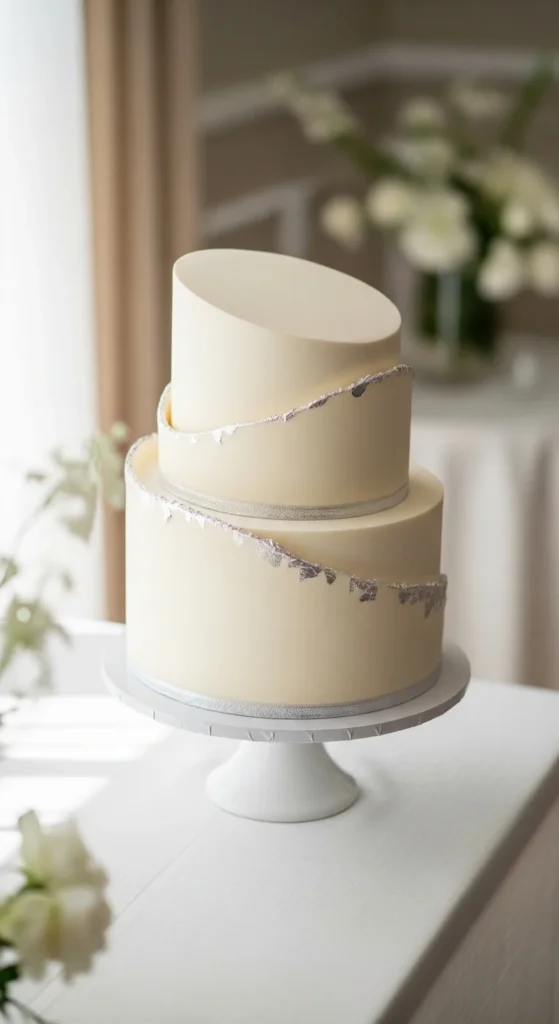
20. Metallic Pearlescent White Cake

This cake keeps a classic white base but adds a soft pearlescent finish that reflects light subtly. The result is a clean design with a touch of luxury, making it suitable for both modern and traditional weddings.
Ingredients
- Cake tiers
- White fondant or buttercream
- Edible pearl or metallic dust
- Soft brush for application
- Cake boards and dowels
Instructions
- Stack and smooth the cake with a clean white finish.
- Chill until the surface is firm.
- Use a soft brush to apply pearlescent dust evenly.
- Build up layers gradually to control the shine.
- Check lighting to ensure an even finish across tiers.
- Avoid over-applying to keep the effect subtle.
How to Serve It
Place it under soft lighting so the sheen becomes visible. It works well with both minimal and slightly decorative setups. The shine adds elegance without needing extra detail.
21. Sheet-Style Long Wedding Cake
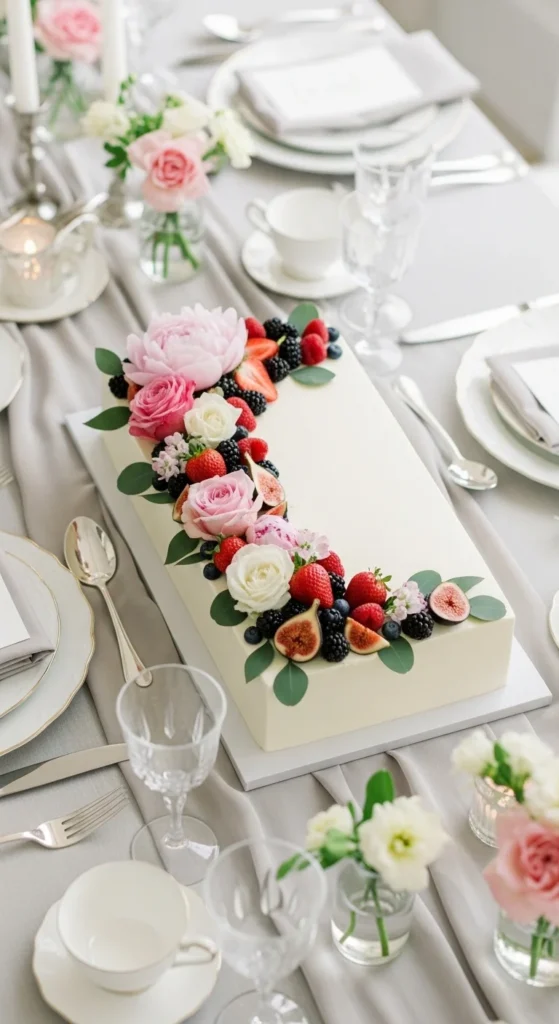
This cake breaks away from traditional shapes by using a long rectangular format. It’s practical for serving larger groups while still looking stylish and modern. The length allows for creative decoration without stacking multiple tiers.
Ingredients
- Large rectangular cake base
- Buttercream or light frosting
- Fresh flowers, fruit, or minimal decorations
- Cake board or tray support
Instructions
- Bake or assemble a long rectangular cake on a stable base.
- Apply a crumb coat and chill until firm.
- Add a smooth or lightly textured final layer of frosting.
- Decorate along the length of the cake instead of stacking upward.
- Keep decoration balanced across the surface.
- Ensure the base is strong enough for transport and display.
How to Serve It
Place it along a long table so its shape stands out. It’s easy to cut and serve directly, which makes it practical for larger receptions. Keep the styling simple so the shape remains the focus.
22. Oval Modern Wedding Cake
This cake replaces sharp edges with soft curves, giving it a modern but gentle look. The oval shape feels unique without being too bold, making it perfect for couples who want something different yet still elegant.
Ingredients
- Oval-shaped cake tiers
- Fondant or smooth buttercream
- Cake boards and internal supports
- Smoothing tools
Instructions
- Bake or carve cake layers into an oval shape with even sides.
- Stack layers carefully and secure with internal supports.
- Apply a crumb coat and chill until firm.
- Cover with fondant or buttercream, smoothing along the curves.
- Refine the shape to keep edges soft and even.
- Keep decoration minimal to highlight the form.
How to Serve It
Place it where the curved shape is visible from multiple angles. It looks best with soft, modern décor. Keep the setup simple so the shape stands out.
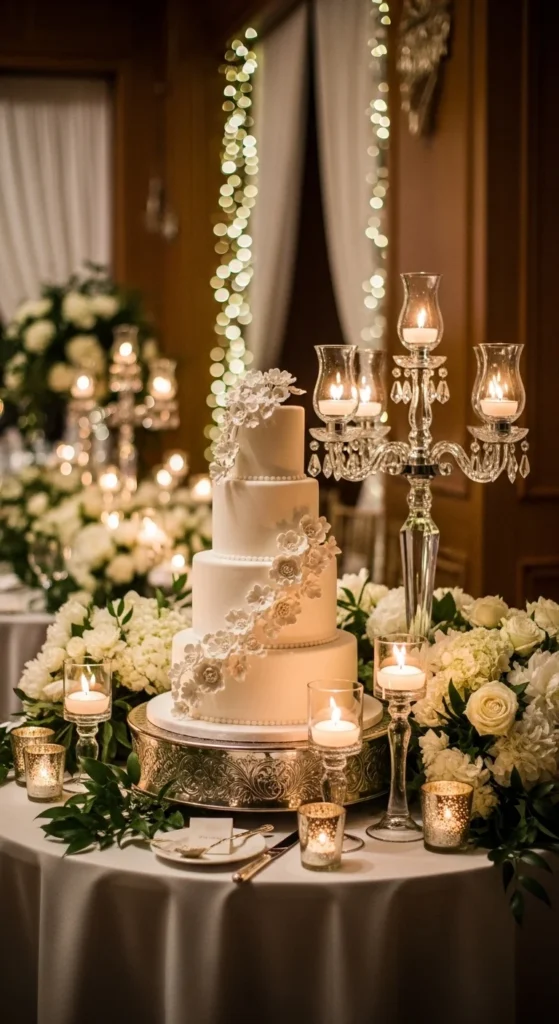
23. Ribbon and Candle Cakescaped Cake
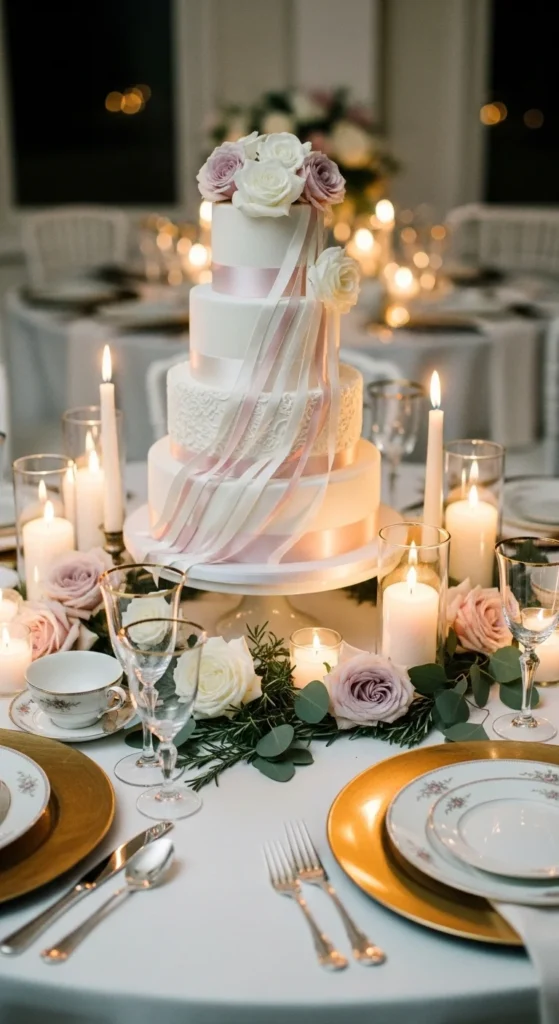
This design focuses not just on the cake but the entire presentation around it. Ribbons wrap around the tiers while candles create a warm, glowing setup. It turns the cake into part of a larger styled display.
Ingredients
- Cake tiers (smooth finish)
- Decorative ribbon (food-safe placement)
- Candles for surrounding setup
- Cake stand or table décor
Instructions
- Prepare and smooth the cake with buttercream or fondant.
- Wrap ribbon gently around each tier without pressing into the surface.
- Secure ribbon ends neatly at the back.
- Place the cake on a stable stand.
- Arrange candles around the base at safe distances.
- Check overall balance between cake and surrounding elements.
How to Serve It
Light the candles shortly before guests arrive to create a warm atmosphere. Keep the setup uncluttered so the cake remains the focus. It looks especially beautiful during evening receptions.
24. Wafer Paper Floral Cake
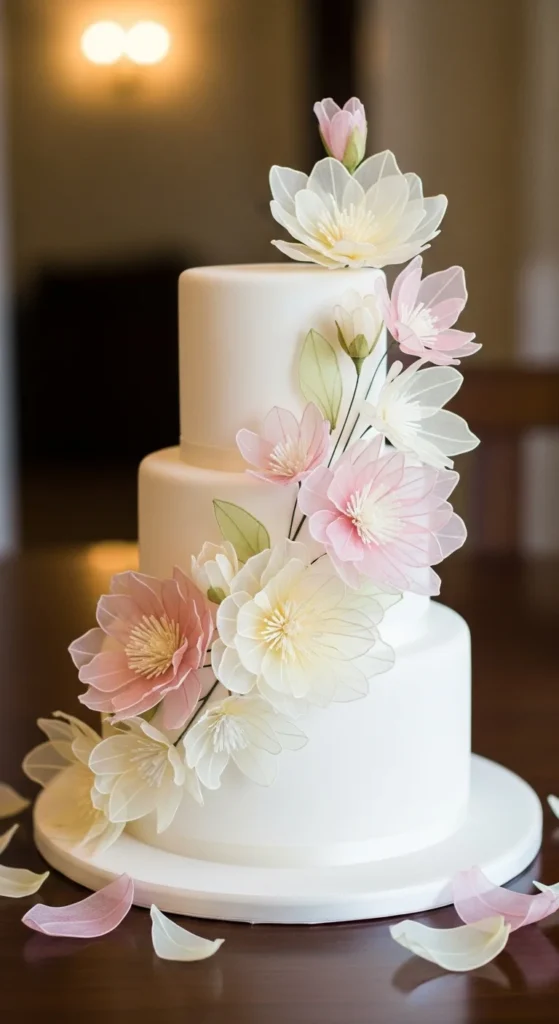
This cake uses lightweight wafer paper to create soft, almost translucent flowers. The petals look delicate and airy, giving the cake a refined and artistic feel without adding weight.
Ingredients
- Cake tiers
- Smooth fondant or buttercream
- Wafer paper sheets
- Edible glue or water
- Floral shaping tools
Instructions
- Prepare and smooth the cake surface, then chill until firm.
- Cut wafer paper into petal shapes.
- Shape petals gently using tools or by hand.
- Assemble flowers layer by layer using edible glue.
- Attach finished flowers to the cake surface carefully.
- Allow flowers to set and dry before final display.
How to Serve It
Place it in a dry environment since wafer paper is sensitive to moisture. Keep lighting soft to highlight the delicate texture. It pairs well with minimal, elegant décor.
25. Baroque Sculpted Wedding Cake
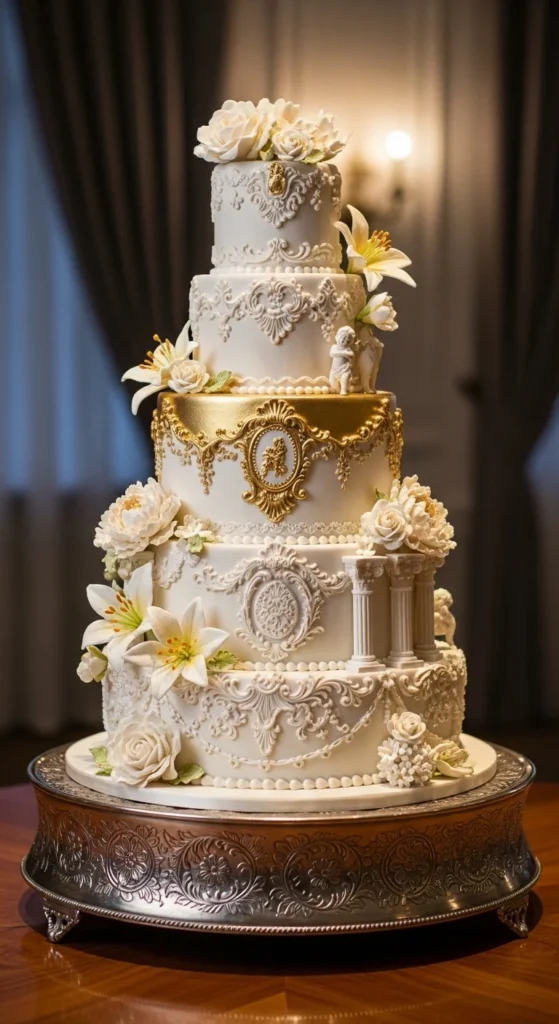
This cake is detailed and dramatic, featuring sculpted patterns inspired by classical designs. It often includes raised textures and ornate elements that give it a luxurious, almost architectural feel.
Ingredients
- Cake tiers (firm structure)
- Fondant or modeling chocolate
- Molds or sculpting tools
- Edible paint or dust (optional)
- Cake boards and supports
Instructions
- Stack and secure cake tiers with strong internal support.
- Cover the cake with fondant for a smooth base.
- Use molds or tools to create raised decorative patterns.
- Attach sculpted pieces carefully to the cake surface.
- Refine edges and details for a clean finish.
- Add light shading or dust for depth if needed.
How to Serve It
Place it in a central, well-lit area so the details are visible. It works best with classic or luxurious décor. The design is already detailed, so keep surrounding elements minimal.
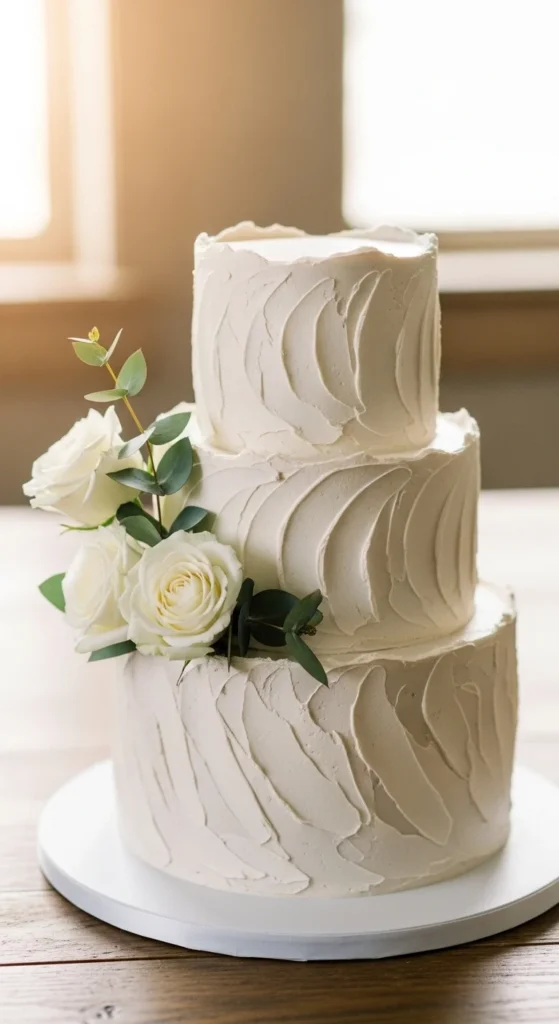
26. Minimalist Naked Elegant Cake
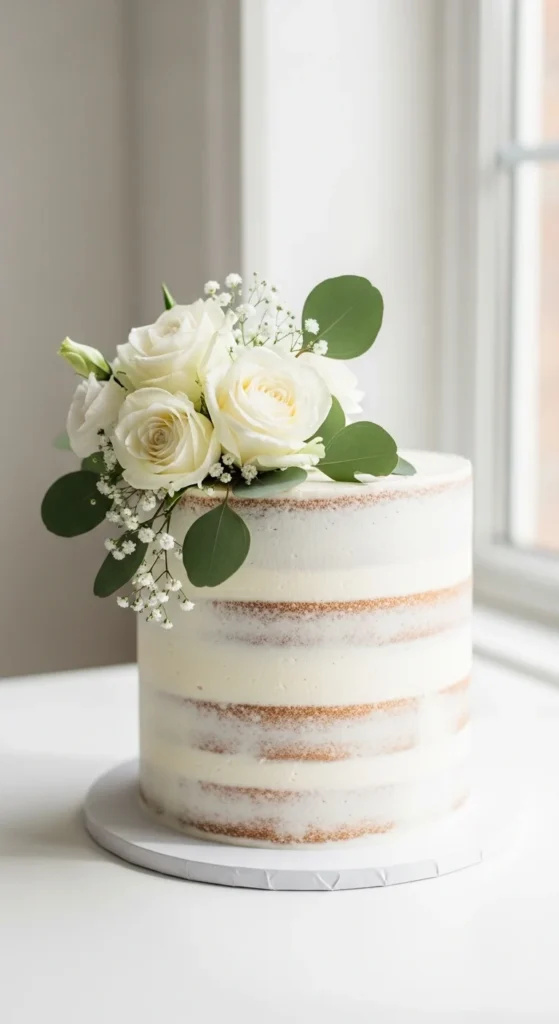
This cake keeps things simple by showing the layers through a thin coating of frosting. It feels natural, light, and slightly rustic while still looking elegant when styled properly. It’s a great option for outdoor or garden-style weddings.
Ingredients
- Cake tiers (fully baked and leveled)
- Light buttercream frosting
- Fresh flowers or simple décor
- Cake boards and dowels
Instructions
- Stack and secure cake tiers using dowels for support.
- Apply a very thin layer of buttercream, allowing layers to remain visible.
- Smooth lightly without covering the cake completely.
- Clean edges while keeping the “naked” effect intact.
- Add fresh flowers or minimal decoration.
- Chill briefly to stabilize before display.
How to Serve It
Place it in a natural setting where soft light enhances its texture. It pairs beautifully with greenery and simple décor. Keep everything relaxed so the cake feels effortless and elegant.
27. Herb & Floral Infused Modern Cake
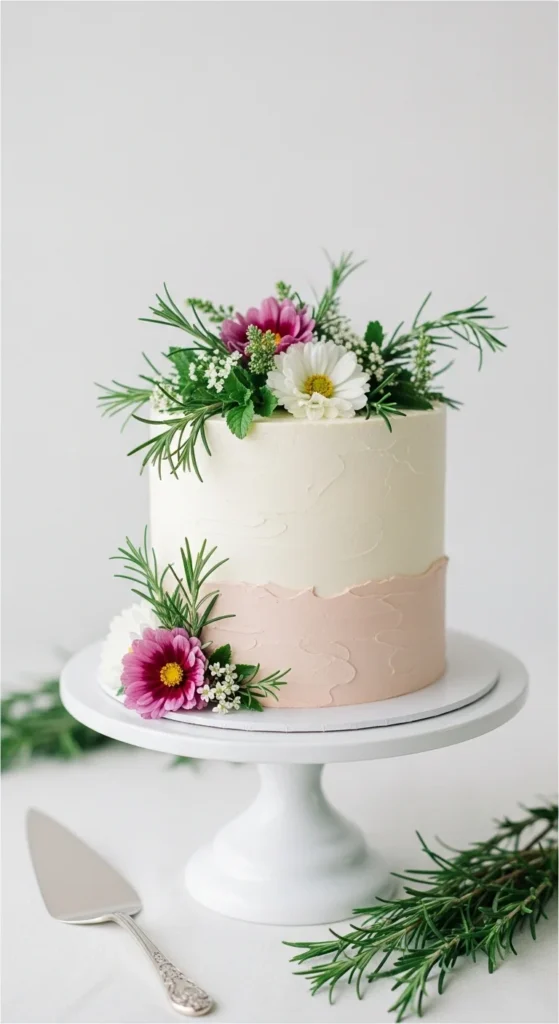
This cake combines herbs and edible flowers to create a fresh and slightly unique design. The greenery adds texture while keeping the look clean and modern. It’s perfect for couples who want something subtle but different.
Ingredients
- Cake tiers
- Smooth buttercream or fondant
- Fresh herbs (rosemary, thyme, or similar)
- Edible flowers
- Cake boards and supports
Instructions
- Stack and smooth the cake with a clean finish.
- Wash and dry herbs and flowers completely.
- Plan placement to avoid overcrowding.
- Attach herbs and flowers gently using buttercream.
- Focus decoration on one area or lightly across tiers.
- Keep spacing natural and balanced.
How to Serve It
Place it in a well-lit area where the greenery stands out. It works especially well for outdoor or daytime receptions. The natural elements already add character, so keep the setup simple.
Conclusion
Choosing the right wedding cake comes down to finding a balance between style, simplicity, and what fits your overall theme. Whether you prefer a classic tiered design, something modern and minimal, or a bold statement piece, each option offers its own kind of elegance.
These ideas give you a clear direction so you can visualize what works best for your reception without feeling overwhelmed. Save your favorites, share them with your baker, and focus on creating a cake that not only looks beautiful but also feels right for your day.